Ultimate Guide to Reach Silicone Hose Installation Tips?
When it comes to performance upgrades, the Reach Silicone Hose stands out as a vital component. These hoses are designed to endure high temperatures and pressures, making them ideal for various applications. Proper installation is key to harnessing their full potential. The right techniques ensure optimal performance and longevity.
Many enthusiasts overlook the nuances of silicone hose installation. Even minor mistakes can lead to leaks or reduced effectiveness. It’s crucial to pay attention to detail at every step. Ensuring a tight fit and avoiding kinks is essential for maintaining airflow and preventing damage.
Experience matters in the installation process. Observing professionals can provide valuable insights. However, it's natural to make errors as you learn. Being open to reflection on those experiences will enhance your skills in the long run. Ultimately, mastering the Reach Silicone Hose installation requires patience and practice.
Selecting the Right Silicone Hose for Your Project
When selecting the right silicone hose for your project, it's crucial to consider several factors. The hose's diameter should match your application needs. A correct size ensures optimal airflow and prevents leaks. Pay attention to the temperature rating of the silicone. Different projects may require hoses that withstand high heat or extreme cold. Choosing a hose with the wrong temperature rating can lead to failure.
Tips for picking the right silicone hose include checking the material quality. Higher-grade silicone usually offers better flexibility and durability. Consider the type of reinforcement used in the hose. Reinforced hoses are ideal for high-pressure applications. Don’t overlook the specific environmental conditions your hose will face. Moisture, ozone, and chemicals can degrade silicone over time.
You may struggle with installation. Poor fitting can compromise performance. Ensure that all connections are secure and appropriate clamps are used. Sometimes, trial and error is necessary. Reviewing your setup after installation may reveal areas for improvement. Adjust and refine your approach for the best results.
Preparing Your Vehicle for Silicone Hose Installation
Preparing your vehicle for silicone hose installation is crucial for success. Start by gathering essential tools, including wrenches and pliers. Ensure your workspace is clean and well-lit. A clutter-free area helps prevent accidents. Additionally, having replacement clamps and cleaning supplies ready will streamline the process.
Next, inspect your current hoses. Look for signs of wear, such as cracks or leaks. Document any issues you find. This will give you a clearer picture of what needs changing. Don't rush this inspection; thoroughness can save time later.
After that, make sure your engine is cool before you begin. Hot components can lead to burns or injuries. Disconnect the battery to enhance safety. It’s easy to overlook this step, but it’s important. Taking these precautions helps create a safer environment for the installation.
Step-by-Step Guide to Silicone Hose Installation
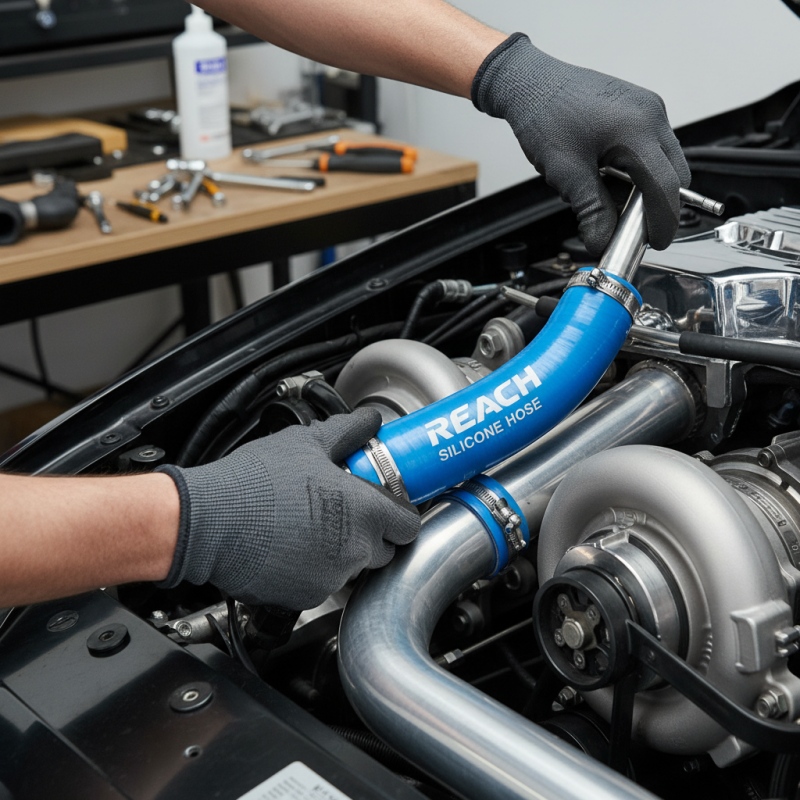
Installing silicone hoses can significantly enhance your vehicle’s performance. It’s essential to approach this task with the right methods. Begin by gathering your tools. You will need scissors, clamps, and a good sealant. Ensure your working area is clean and well-lit.
Start by removing the old hoses. This might require some effort. Be cautious with connectors. After removal, clean the attachment points thoroughly. Dirt can compromise the fit. Next, measure the new silicone hose. Cut it to the desired length if necessary. Precision matters here. A too-short hose will leak, and a too-long one will not fit well.
When installing the new hose, make sure it sits securely on the connectors. Tighten clamps evenly. It’s easy to over-torque them. This can damage the hose. After installation, run the engine to check for leaks. Sometimes, what seems perfect doesn’t always work flawlessly. Make adjustments if needed. Regularly inspect the hoses for any signs of wear or stress. Keeping an eye on these details can prevent larger issues down the road.
Common Mistakes to Avoid During Installation
When installing silicone hoses, many people overlook critical details. One common mistake is failing to clean surfaces thoroughly. Dirt or residues can lead to poor seals. Always ensure the connection points are free from contaminants before assembly.
Another frequent error is over-tightening clamps. This can damage the hose and create leaks over time. Instead, tighten clamps just enough to create a secure fit without exerting excessive pressure. Visual inspection after installation is vital. Look for any signs of misalignment or stress.
Tips for installation include using soap or water as a lubricant. This can help the hose slide into place easily. Additionally, check the operating temperature and pressure specifications for the hoses you use. Understanding these factors may prevent future failures. Consider revisiting your installation process periodically to ensure optimal performance.
Common Mistakes to Avoid During Silicone Hose Installation
Maintenance Tips for Silicone Hoses After Installation
Silicone hoses have gained popularity for their durability and flexibility. However, many users overlook the importance of maintenance after installation. Regular maintenance prolongs lifespan and ensures optimal performance. Data from industry reports suggest that well-maintained silicone hoses can last up to 50% longer than those regularly ignored.
Inspect hoses periodically for signs of wear or damage. Look for cracks, leaks, or discoloration. These are indicators that replacement might be necessary. A study by the Rubber Manufacturers Association highlights that about 30% of silicone hose failures occur due to lack of proper inspection. Cleaning these hoses is equally crucial. Use a mild soap solution and a soft brush. This practice removes dirt and residue, preventing potential blockages.
Additionally, the environment can affect hose performance. High temperatures and exposure to UV light may deteriorate silicone over time. It's beneficial to store spare hoses in a cool, dry place away from direct sunlight. Ignoring such environmental factors may lead to premature hose failure. Recognizing these nuances can transform your approach to silicone hose maintenance.
Ultimate Guide to Reach Silicone Hose Installation Tips - Maintenance Tips for Silicone Hoses After Installation
| Tip Category | Installation Tips | Post-Installation Maintenance |
| Preparation | Ensure all surfaces are clean and free from debris before installation. | Check for any signs of wear or damage regularly. |
| Clamps | Use quality clamps to secure hoses tightly without over-tightening. | Re-torque clamps after a short period of use to ensure a snug fit. |
| Temperature Control | Install away from direct heat sources to prevent degradation. | Monitor temperature ranges and ensure they are within safe limits. |
| Alignment | Ensure proper alignment to avoid kinking of the hose. | Check hoses for proper alignment and rectify any misalignment immediately. |
| Testing | Perform a pressure test after installation to ensure no leaks. | Regularly inspect for leaks and replace any faulty hoses as needed. |